How to Create Custom Payment Method in Magento 2
As we all know there are lots of payment options available by the Magento community. But in some case we need to develop some custom payment methods to meet customer expectations. So, in this article, we'll create a custom payment method in Magento 2. For that, we'll create a custom module to add a custom payment method.
Let's get started!!
To create a custom payment method module you have to follow the simple step which is listed below.
Before we start, we need to create Devhooks folder as a Namespace at app/code/ and create a Module folder CustomPayment at app/code/Devhooks/ location.
Step 1: Create a module.xml file at app/code/Devhooks/CustomPayment/etc/ and paste the below code.
Note: Don't forgot to replace the Devhooks_CustomPayment with your Namespace and Module Name if it's different.
saveCopyzoom_out_map<?xml version="1.0"?>
<config xmlns:xsi="http://www.w3.org/2001/XMLSchema-instance" xsi:noNamespaceSchemaLocation="../../../../../lib/internal/Magento/Framework/Module/etc/module.xsd">
    <module name="Devhooks_CustomPayment" setup_version="1.0.0">
        <sequence>
            <module name="Magento_Sales"/>
            <module name="Magento_Payment"/>
            <module name="Magento_Checkout"/>
        </sequence>
    </module>
</config>
Our module is depends on other modules. So, we've added it's dependencies under <module> tag in module.xml file. Check above code for your reference.
Step 2: Create registration file registration.php at app/code/Devhooks/CustomPayment/ and paste the below code.
saveCopyzoom_out_map<?php
\Magento\Framework\Component\ComponentRegistrar::register(
    \Magento\Framework\Component\ComponentRegistrar::MODULE,
    'Devhooks_CustomPayment',
    __DIR__
);
Step 3: Create a system.xml at app/code/Devhooks/CustomPayment/etc/adminhtml/ and paste the below code to add Custom Shipping Method configurations.
saveCopyzoom_out_map<?xml version="1.0"?>
<config xmlns:xsi="http://www.w3.org/2001/XMLSchema-instance"
xsi:noNamespaceSchemaLocation="urn:magento:module:Magento_Config:etc/system_file.xsd">
  <system>
    <section id="payment" translate="label" type="text" sortOrder="400" showInDefault="1" showInWebsite="1" showInStore="1">
      <group id="custompayment" translate="label" type="text" sortOrder="101" showInDefault="1" showInWebsite="1" showInStore="1">
        <label>Custom Payment</label>
        <field id="active" translate="label" type="select" sortOrder="1" showInDefault="1" showInWebsite="1" showInStore="0" canRestore="1">
          <label>Enabled</label>
          <source_model>Magento\Config\Model\Config\Source\Yesno</source_model>
        </field>
        <field id="order_status" translate="label" type="select" sortOrder="20" showInDefault="1" showInWebsite="1" showInStore="0" canRestore="1">
          <label>New Order Status</label>
          <source_model>Magento\Sales\Model\Config\Source\Order\Status\NewStatus</source_model>
        </field>
        <field id="sort_order" translate="label" type="text" sortOrder="100" showInDefault="1" showInWebsite="1" showInStore="0">
          <label>Sort Order</label>
          <frontend_class>validate-number</frontend_class>
        </field>
        <field id="title" translate="label" type="text" sortOrder="10" showInDefault="1" showInWebsite="1" showInStore="1" canRestore="1">
          <label>Title</label>
        </field>
        <field id="allowspecific" translate="label" type="allowspecific" sortOrder="50" showInDefault="1" showInWebsite="1" showInStore="0" canRestore="1">
          <label>Payment from Applicable Countries</label>
          <source_model>Magento\Payment\Model\Config\Source\Allspecificcountries</source_model>
        </field>
        <field id="specificcountry" translate="label" type="multiselect" sortOrder="51" showInDefault="1" showInWebsite="1" showInStore="0">
          <label>Payment from Specific Countries</label><source_model>Magento\Directory\Model\Config\Source\Country</source_model>
          <can_be_empty>1</can_be_empty>
        </field>
        <field id="min_order_total" translate="label" type="text" sortOrder="98" showInDefault="1" showInWebsite="1" showInStore="0">
          <label>Minimum Order Total</label>
        </field>
        <field id="max_order_total" translate="label" type="text" sortOrder="99" showInDefault="1" showInWebsite="1" showInStore="0">
          <label>Maximum Order Total</label>
        </field>
        <field id="model"></field>
      </group>
    </section>
  </system>
</config>
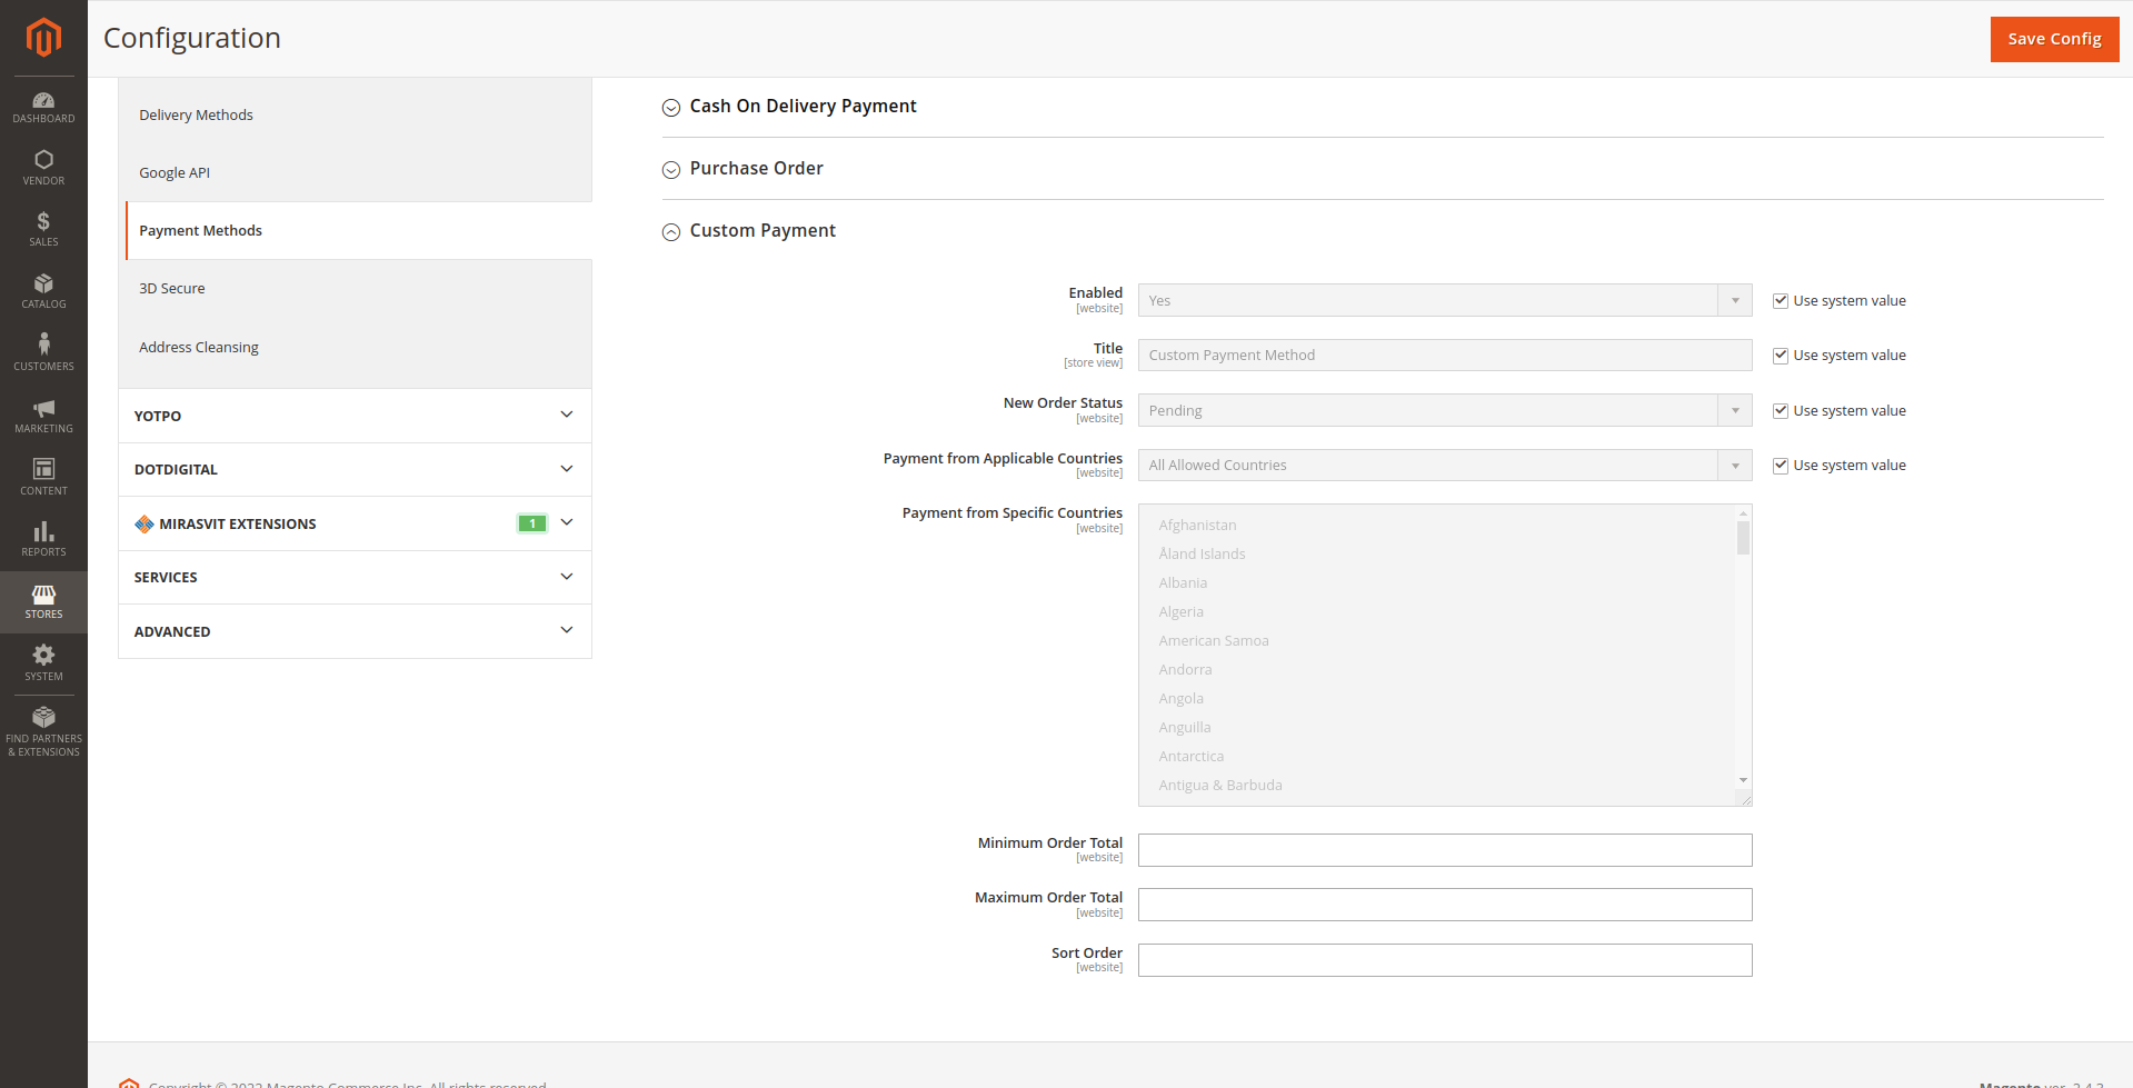
In Above code we've declared custom payment module options
- Enabled
- Title
- New Order Status
- Payment from Applicable Countries
- Payment from Specific Countries
- Minimum Order Total
- Maximum Order Total
- Sort Order
Now, to set default options we need to create config.xml file.
Step 4: Create a default configuration file config.xml at app/code/Devhooks/CustomPayment/etc/ location and paste the below code.
saveCopyzoom_out_map<?xml version="1.0"?>
<config xmlns:xsi="http://www.w3.org/2001/XMLSchema-instance"
xsi:noNamespaceSchemaLocation="urn:magento:module:Magento_Store:etc/config.xsd">
    <default>
        <payment>
            <custompayment>
                <active>1</active>
                <model>Devhooks\CustomPayment\Model\CustomPayment</model>
                <order_status>pending</order_status>
                <title>Custom Payment Method</title>
                <allowspecific>0</allowspecific>
                <group>offline</group>
            </custompayment>
        </payment>
    </default>
</config>
You can change above default values as per your need.
Step 5: Create a model file CustomPayment.php at app/code/Devhooks/CustomPayment/Model/ location and paste the below code.
saveCopyzoom_out_map<?php

namespace Devhooks\CustomPayment\Model;

class CustomPayment extends \Magento\Payment\Model\Method\AbstractMethod
{

    const PAYMENT_METHOD_CUSTOM_INVOICE_CODE = 'custompayment';

    /**
    * Payment method code
    *
    * @var string
    */
    protected $_code = self::PAYMENT_METHOD_CUSTOM_INVOICE_CODE;
}
Now we need to create a layout file to define payment method renderer.
Step 6: Create a layout file checkout_index_index.xml at app/code/Devhooks/CustomPayment/view/frontend/layout/ location and paste the below code.
saveCopyzoom_out_map<?xml version="1.0"?>
<page xmlns:xsi="http://www.w3.org/2001/XMLSchema-instance"
xsi:noNamespaceSchemaLocation="urn:magento:framework:View/Layout/etc/page_configuration.xsd">
    <body>
        <referenceBlock name="checkout.root">
            <arguments>
                <argument name="jsLayout" xsi:type="array">
                    <item name="components" xsi:type="array">
                        <item name="checkout" xsi:type="array">
                            <item name="children" xsi:type="array">
                                <item name="steps" xsi:type="array">
                                    <item name="children" xsi:type="array">
                                        <item name="billing-step" xsi:type="array">
                                            <item name="children" xsi:type="array">
                                                <item name="payment" xsi:type="array">
                                                    <item name="children" xsi:type="array">
                                                        <item name="renders" xsi:type="array">
                                                            <!-- merge payment method renders here -->
                                                            <item name="children" xsi:type="array">
                                                                <item name="pits-offlinepaymentmethods" xsi:type="array">
                                                                    <item name="component" xsi:type="string">Devhooks_CustomPayment/js/view/payment/method-renderer</item>
                                                                    <item name="methods" xsi:type="array">
                                                                        <item name="custompayment" xsi:type="array">
                                                                            <item name="isBillingAddressRequired" xsi:type="boolean">true</item>
                                                                        </item>
                                                                    </item>
                                                                </item>
                                                            </item>
                                                        </item>
                                                    </item>
                                                </item>
                                            </item>
                                        </item>
                                    </item>
                                </item>
                            </item>
                        </item>
                    </item>
                </argument>
            </arguments>
        </referenceBlock>
    </body>
</page>
As you can see in above code we've define Devhooks_CustomPayment/js/view/payment/method-renderer as a component. So, now we need to create Payment Method Renderer file.
Step 7: Create a method-renderer.js file at app/code/Devhooks/CustomPayment/view/frontend/web/js/view/payment/ location and paste the below code.
saveCopyzoom_out_mapdefine(
  [
    'uiComponent',
    'Magento_Checkout/js/model/payment/renderer-list'
  ],
  function (
    Component,
    rendererList
  ) {
    'use strict';
    rendererList.push(
      {
        type: 'custompayment',
        component: 'Devhooks_CustomPayment/js/view/payment/method-renderer/custompayment'
      }
  );

  /** Add view logic here if needed */
  return Component.extend({});

  }
);
Step 8: Create a custompayment.js file at app/code/Devhooks/CustomPayment/view/frontend/web/js/view/payment/method-renderer/ location and paste the below code.
saveCopyzoom_out_mapdefine(
  [
    'Magento_Checkout/js/view/payment/default'
  ],
  function (Component) {
    'use strict';

    return Component.extend({
      defaults: {
        template: 'Devhooks_CustomPayment/payment/customtemplate'
      },

      /** Returns send check to info */
      getMailingAddress: function() {
        return window.checkoutConfig.payment.customtemplate.mailingAddress;
      }

    });
  }
);
Now, we need to create a template file as we defined above.
Step 9: Create a customtemplate.html file at app/code/Devhooks/CustomPayment/view/frontend/web/template/payment/ location and paste the below code.
saveCopyzoom_out_map<div class="payment-method" data-bind="css: {'_active': (getCode() == isChecked())}">
  <div class="payment-method-title field choice">
    <input type="radio"   name="payment[method]" class="radio" data-bind="attr: {'id': getCode()}, value: getCode(), checked: isChecked, click: selectPaymentMethod, visible: isRadioButtonVisible()"/>
    <label data-bind="attr: {'for': getCode()}" class="label"><span data-bind="text: getTitle()"></span></label>
  </div>
  <div class="payment-method-content">
    <!-- ko foreach: getRegion('messages') -->
    <!-- ko template: getTemplate() --><!-- /ko -->
    <!--/ko-->
    <div class="payment-method-billing-address">
    <!-- ko foreach: $parent.getRegion(getBillingAddressFormName()) -->
    <!-- ko template: getTemplate() --><!-- /ko -->
    <!--/ko-->
    </div>
    <div class="checkout-agreements-block">
    <!-- ko foreach: $parent.getRegion('before-place-order') -->
    <!-- ko template: getTemplate() --><!-- /ko -->
    <!--/ko-->
    </div>
    <div class="actions-toolbar">
      <div class="primary">
        <button class="action primary checkout" type="submit" data-bind="   click: placeOrder,  attr: {title: $t('Place Order')}, css: {disabled: !isPlaceOrderActionAllowed()}, enable: (getCode() == isChecked()) " disabled>
        <span data-bind="i18n: 'Place Order'"></span>
        </button>
      </div>
    </div>
  </div>
</div>
Step 10: Open Command line in folder root of magento and run the below commands.
saveCopyzoom_out_mapphp bin/magento setup:upgrade

php bin/magento cache:clean
Bingo!! we are done all steps.
Now open admin and go to Stores > Configuration > Sales > Payment Methods and You will see your Custom Payment Method like the below screenshot.

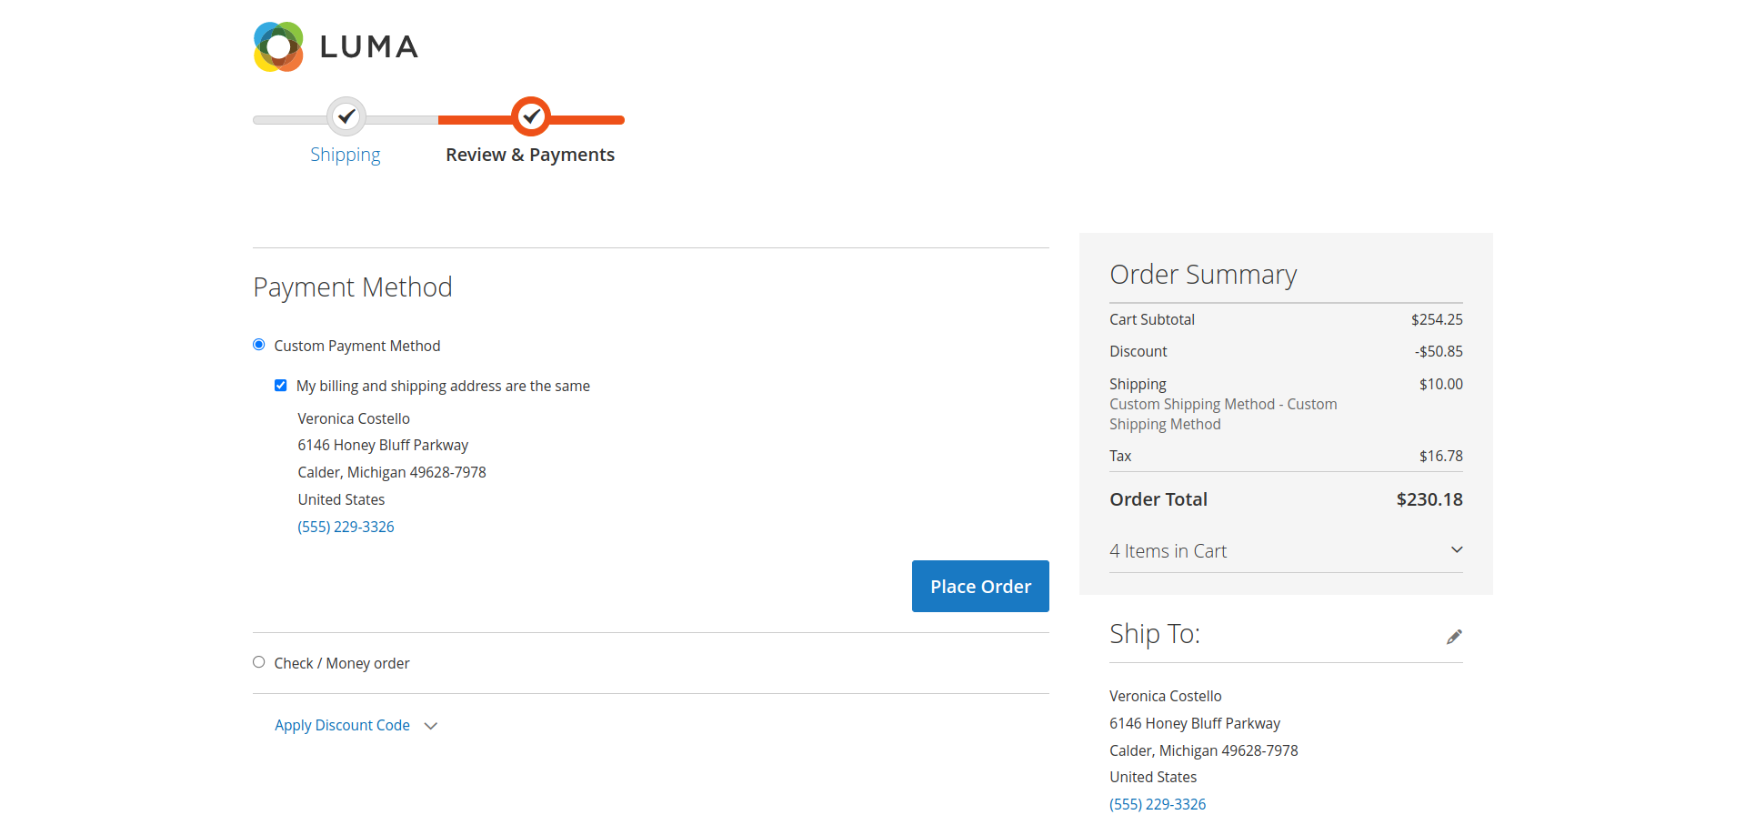
You can change the settings as per your need. Now go to frontend, add product to shopping cart and go to checkout. You'll see your Custom Payment Method like the below screenshot in checkout.

That's it!!
I hope this article helped you to find what you were looking for.
Bookmark it for your future reference. Do comment below if you have any other questions on that.
P.S. Do share this article with your team.
Review other articles maybe it'll help you too.
- How To Create Magento 2 Module with Admin Grid and Form using UI Component
- How to Create Custom Database in Magento 2
- How to Insert Sample Data in Magento 2
- How to Create Model, Resource Model, and Collection in Magento 2
- How to Add Custom Admin Menu In Magento 2
- How to Create UI Component Grid In Magento 2
- How to Add Mass Action in UI Component Grid in Magento 2
- How to Create UI Component Form and CRUD Operation In Magento 2
- How to Create Custom GraphQL Query in Magento 2