How to Add Mass Action in UI Component Grid in Magento 2
If you are looking for a simple way to add mass action in the admin grid in Magento 2, then you are in a right place. In this article, We're going to explain you How to Add Mass Action in UI Component Grid in Magento 2. After following few simple steps of this article you are able to easily add mass action in UI Component Grid.
Other articles you my like
- How To Create Magento 2 Module
- How to Create Custom Database in Magento 2
- How to Insert Sample Data in Magento 2
- How to Create Model, Resource Model, and Collection in Magento 2
- How to Add Custom Admin Menu In Magento 2
- How to Create UI Component Grid In Magento 2
- How to Create UI Component Form and CRUD Operation In Magento 2
Let's get started!!
Insert a MassAction tag in your UI Component XML file. For example your file name is ui_listing.xml at app/code/Devhooks/HelloWorld/view/adminhtml/ui_component/ location.
Step 1: Open ui_listing.xml file at app/code/Devhooks/HelloWorld/view/adminhtml/ui_component/ and add the below code under listingToolbar.
saveCopyzoom_out_map<listing>
        <listingToolbar>
            ....
            <massaction name="listing_massaction" component="Magento_Ui/js/grid/tree-massactions" class="\Magento\Catalog\Ui\Component\Product\MassAction">
                <action name="delete">
                    <settings>
                        <confirm>
                            <message translate="true">Delete selected items?</message>
                            <title translate="true">Delete items</title>
                        </confirm>
                        <url path="*/*/massDelete" />
                        <type>delete</type>
                        <label translate="true">Delete</label>
                    </settings>
                </action>
            </massaction>
            ...
        </listingToolbar>
    </listing>
As you see, we've added massDelete action in url path. So, now we need to create MassDelete.php controller file to delete all selected records.
Step 2: Create MassDelete.php file at app/code/Devhooks/HelloWorld/Controller/Adminhtml/Index/ and paste the below code.
saveCopyzoom_out_map<?php

namespace Devhooks\HelloWorld\Controller\Adminhtml\Index;

use Devhooks\HelloWorld\Model\ResourceModel\HelloWorld\CollectionFactory;
use Magento\Backend\App\Action;
use Magento\Backend\App\Action\Context;
use Magento\Framework\Registry;
use Magento\Framework\View\Result\PageFactory;
use Magento\Ui\Component\MassAction\Filter;

class MassDelete extends Action
{
    protected $_coreRegistry = null;
    protected $resultPageFactory;
    protected $HelloWorldFactory;
    public function __construct(
        Context $context,
        PageFactory $resultPageFactory,
        Registry $registry,
        Filter $filter,
        CollectionFactory $HelloWorld
    ) {
        $this->resultPageFactory = $resultPageFactory;
        $this->_coreRegistry = $registry;
        $this->HelloWorldFactory = $HelloWorld;
        $this->filter = $filter;
        parent::__construct($context);
    }
    public function execute()
    {
        $collection = $this->filter->getCollection($this->HelloWorldFactory->create());

        $count = 0;
        foreach ($collection as $child) {
            $child->delete();
            $count++;
        }

        $this->messageManager->addSuccess(__('A total of %1 record(s) have been deleted.', $count));
        $resultRedirect = $this->resultRedirectFactory->create();
        return $resultRedirect->setPath('*/*/index');
    }
}
Step 3: Now, open Command line in folder root of magento and run both commands
saveCopyzoom_out_mapphp bin/magento cache:clean
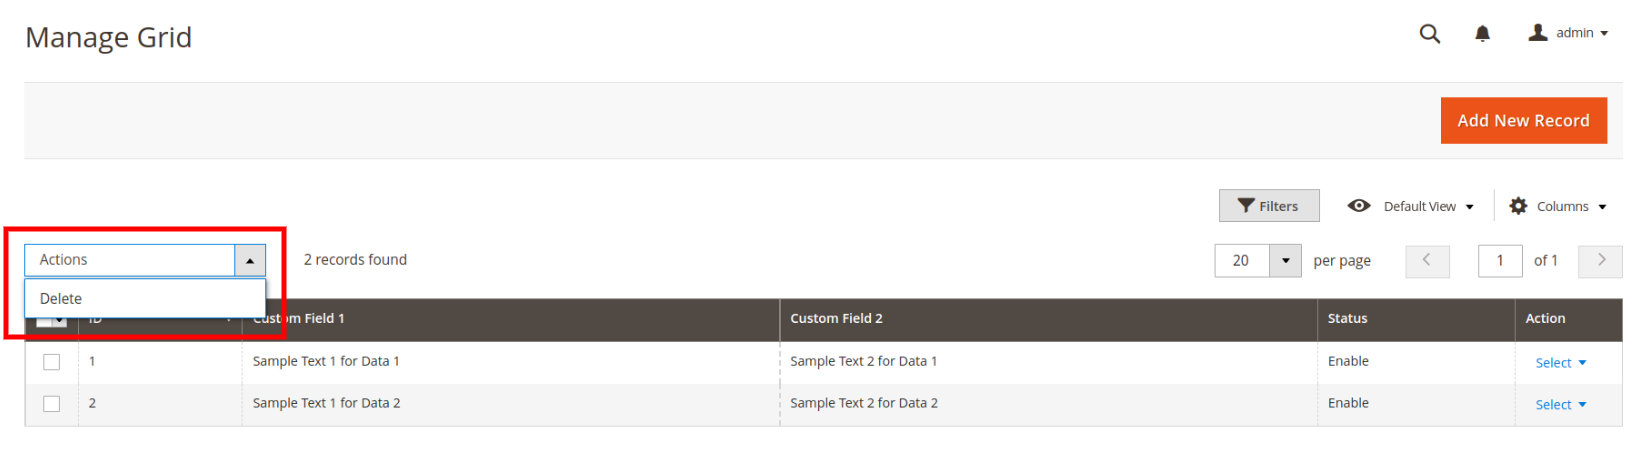
Log in to the admin of your Magento 2 and navigate to the grid you'll see grid with massaction like the below screenshot.
That's it.
We have successfully add mass action in UI Component Grid, we hope this article helped you to know How to Add Mass Action in UI Component Grid in Magento 2.
If you want to create UI Component Form then check our another article which is How to Create UI Component Form and Perform CRUD Operation In Magento 2.
Stay Tuned...
Bookmark it for your future reference. Do comment below if you have any other questions or doubts.
P.S. Do share this post with your team.
Special thanks to Rutvik Monpara, He helped me a lot to write a series of How to Create UI Component Grid and Form in Magento 2
AI-Powered Recommended Articles
How to Create UI Component Form and CRUD Operation In Magento 2
Learn how to create UI component forms and implement CRUD operations in Magento 2 for efficient backend management.
How To Create Magento 2 Module with Admin Grid and Form using UI Component
Learn how to create a custom Magento 2 module with an admin grid and form using UI components.
How to Create UI Component Grid In Magento 2
Learn how to create a custom UI component grid in Magento 2 for enhanced administrative functionality.
How to Add Custom Admin Menu In Magento 2
Learn how to add a custom admin menu in Magento 2 for creating personalized admin sections.
How to Create Model, Resource Model, and Collection in Magento 2
Step-by-step guide to creating a model, ResourceModel, and collection in Magento 2 for custom data handling.
How to Create Custom Table and Insert Sample Data in Magento 2
Create custom tables in Magento 2 and insert sample data for testing or customization purposes.