How to Add Dynamic Row on Store Configuration in Magento 2
In this article, we’re going to show you how to add a Dynamic Row on backend configuration in Magento 2 with a two text fields.
Before we start I assume, you have already a created custom module. If you don't have it or don't know how to create it then check out our other article How To Create a Magento 2 Module.
Let's get started !!
We hope you already have a system.xml file in your module. If you don't have it then check the below steps and create it.
Step 1: Create system.xml at app/code/Vendor/MultiRowConfig/etc/adminhtml and paste the below code. You need to change code as per your requirement.
saveCopyzoom_out_map<?xml version="1.0"?>
<config xmlns:xsi="http://www.w3.org/2001/XMLSchema-instance" xsi:noNamespaceSchemaLocation="urn:magento:module:Magento_Config:etc/system_file.xsd">
    <system>
        ...
        <field id="test_multi_row" translate="label" sortOrder="10" showInDefault="1" showInWebsite="1" showInStore="1">
            <label>Multi Row</label>
            <frontend_model>Vendor\MultiRowConfig\Block\Adminhtml\MultiRow</frontend_model>
            <backend_model>Magento\Config\Model\Config\Backend\Serialized\ArraySerialized</backend_model>
        </field>
        ...
    </system>
</config>
In the above code, you see we've used frontend model as a Vendor\MultiRowConfig\Block\Adminhtml\MultiRow block to manage the dynamic row in the store configuration. Also use magento 2 default backend_model for an array serialization.
Now, let's create a block file to add fields in a dynamic row.
Step 2: Create MultiRow.php file at app/code/Vendor/MultiRowConfig/Block/Adminhtml/ folder to create block file. And paste the below code.
saveCopyzoom_out_map<?php

namespace Vendor\MultiRowConfig\Block\Adminhtml;

use Magento\Config\Block\System\Config\Form\Field\FieldArray\AbstractFieldArray;

class MultiRow extends AbstractFieldArray
{

    protected function _prepareToRender()
    {
        $this->addColumn('label', ['label' => __('Label'), 'class' => 'required-entry']);
        $this->addColumn('value', ['label' => __('Value'), 'class' => 'required-entry']);
        $this->_addAfter = false;
        $this->_addButtonLabel = __('Add');
    }
}
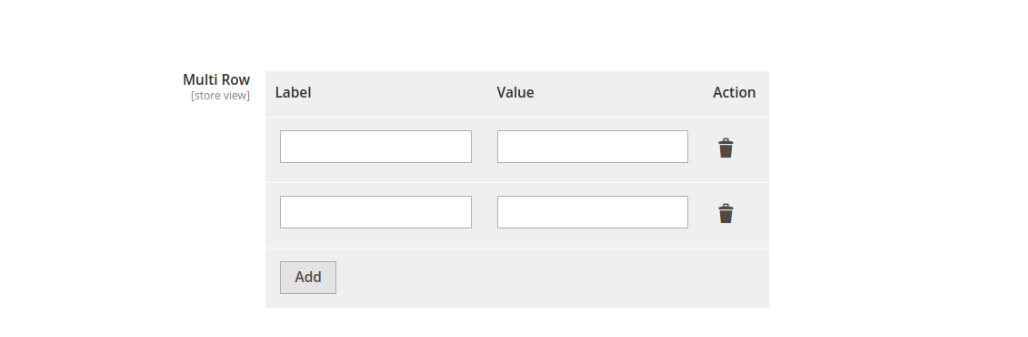
In above code we've added 2 text fields Label and Value. You can see it on the below screenshot.
Now, open Command line in folder root of magento and run the below commands.
saveCopyzoom_out_mapphp bin/magento c:c
You will see Dynamic Row in a text field like the below screenshot.
That’s it,
We hope this Magento post helped you to know How to Add Dynamic Row on Store Configuration in Magento 2. Bookmark it for your future reference. Do comment below if you have any other questions or doubts.
P.S. Do share this post with your team.
AI-Powered Recommended Articles
How to Add Custom Select/MultiSelect Options on Store Configuration in Magento 2
Learn how to add custom select and multiselect options to the store configuration in Magento 2.
How to Add Link on Store Configuration Fields Comment in Magento 2
Add links in the comments of Magento 2 store configuration fields for easier navigation and support.
How to Create UI Component Grid In Magento 2
Learn how to create a custom UI component grid in Magento 2 for enhanced administrative functionality.
Magento 2 - How to Add a Custom Filed in Order Grid
Learn how to add a custom column to the admin order grid in Magento 2 for enhanced order tracking.
How To Create Custom Attribute Set Programmatically In Magento 2
Learn how to create custom attribute sets programmatically in Magento 2 for flexible product management.
How to Create Custom Table and Insert Sample Data in Magento 2
Create custom tables in Magento 2 and insert sample data for testing or customization purposes.