How to Create Custom Table and Insert Sample Data in Magento 2
After completing our first step on how to create Magento 2 module, I hope you understand the process for creating a basic Magento 2 module. Now, let's move to the next step. So, in this article, we're going to see in Magento 2 how to create a custom table and how to insert sample data in that table.
Let's get started!!
Before we start I assume, you have already created custom module. If you don't have it or don't know how to create it then check out our first step How To Create Magento 2 Module.
In this article we'll crete a custom table using db schema. To know more about declarative schema please check it's official guide.
Step 1: Create db_schema.xml at app/code/Devhooks/HelloWorld/etc/ and paste the below code.
saveCopyzoom_out_map<?xml version="1.0"?>
<schema xmlns:xsi="http://www.w3.org/2001/XMLSchema-instance" xsi:noNamespaceSchemaLocation="urn:magento:framework:Setup/Declaration/Schema/etc/schema.xsd">
    <table name="devhooks_helloworld">
        <column xsi:type="int" name="id" padding="10" identity="true" nullable="false" comment="ID" />
        <column xsi:type="varchar" name="custom_field_1" length="100" nullable="false" comment="Custom Field 1" />
        <column xsi:type="varchar" name="custom_field_2" length="100" nullable="false" comment="Custom Field 2" />
        <column xsi:type="int" name="status" padding="10" nullable="true" comment="Status" />
        <constraint xsi:type="primary" referenceId="PRIMARY">
            <column name="id" />
        </constraint>
    </table>
</schema>
In the above code, you see we've used devhooks_helloworld as a table name and added following fields. You can add more fields as you want.
- ID
- Custom Field 1
- Custom Field 2
- Status
Also, in above code we've added ID as a pimary key using below code.
saveCopyzoom_out_map<constraint xsi:type="primary" referenceId="PRIMARY">
    <column name="id" />
</constraint>
If you want to create table without sample data then you need to skip second step.
But in this article we want to show you how to create custom table with sample data in Magento 2.
As we all know, now Magento 2 introduce a new way to add/modify data using Data Patch in Magento2. So, in this article, we'll add sample data usgin data patch. To know more about Data Patch we'll suggest you to check magento official guide.
Before we create a patch file for install sample data we need to create Model, Resource Model, and Collection because we'll use that on data patch file. So, first create all those files and come back here and move to the Step 2 to create data patch file for install sample data.
Step 2: Create AddData.php file at app/code/Devhooks/HelloWorld/Setup/Patch/Data/ and paste the below code.
saveCopyzoom_out_map<?php

namespace Devhooks\HelloWorld\Setup\Patch\Data;

use Magento\Framework\Setup\Patch\DataPatchInterface;
use Magento\Framework\Module\Setup\Migration;
use Magento\Framework\Setup\ModuleDataSetupInterface;

class AddData implements DataPatchInterface
{
     private $HelloWorldFactory;

     public function __construct(
          \Devhooks\HelloWorld\Model\HelloWorldFactory $HelloWorldFactory
     ) {
          $this->HelloWorldFactory = $HelloWorldFactory;
     }

     public function apply()
     {
          $sampleData = [
               [
                    'status' => 1,
                    'custom_field_1' => 'Sample Text 1 for Data 1',
                    'custom_field_2' => 'Sample Text 2 for Data 1'
               ],
               [
                    'status' => 1,
                    'custom_field_1' => 'Sample Text 1 for Data 2',
                    'custom_field_2' => 'Sample Text 2 for Data 2'
               ]
          ];
          foreach ($sampleData as $data) {
               $this->HelloWorldFactory->create()->setData($data)->save();
          }
     }

     public static function getDependencies()
     {
          return [];
     }

     public function getAliases()
     {
          return [];
     }

}
Now, open Command line in folder root of magento and run both commands
saveCopyzoom_out_mapphp bin/magento setup:upgrade

php bin/magento cache:flush
For more informations about Magento 2 Useful Commands List Click Here and read our another technical note.
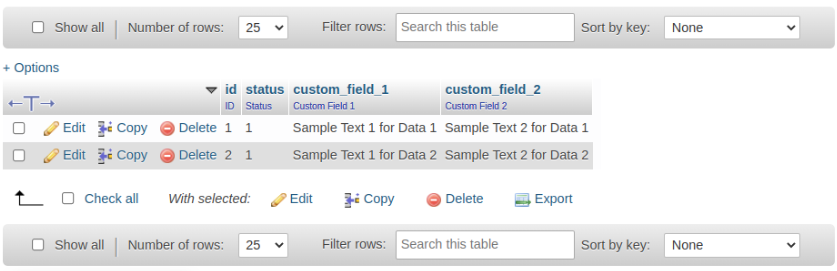
To confirm whether your table is created or not you need find devhooks_helloworld table in your database. Hope you'll see your table like the below screenshot.
Stay Tuned...
Our second step is also done, we hope this article helped you to know How to Create Custom Table and Insert Sample Data in Magento 2.
Now let's move to the next step which is How to Create Model, Resource Model, and Collection in Magento 2. If you already completed this step for add sample data then move to the next step which is How to Add Custom Admin Menu In Magento 2
P.S. Bookmark it for your future reference. Do comment below if you have any other questions or doubts.
🙏 Do share this post with your team.
Special thanks to Rutvik Monpara, He helped me a lot to write a series of How to Create UI Component Grid and Form in Magento 2.
AI-Powered Recommended Articles
Magento 2 Implement Declarative Schema in Custom Module.
A guide on implementing declarative schema in your custom Magento 2 modules to improve database management and scalability.
How to Create UI Component Grid In Magento 2
Learn how to create a custom UI component grid in Magento 2 for enhanced administrative functionality.
How to Create Model, Resource Model, and Collection in Magento 2
Step-by-step guide to creating a model, ResourceModel, and collection in Magento 2 for custom data handling.
How To Create Magento 2 Module with Admin Grid and Form using UI Component
Learn how to create a custom Magento 2 module with an admin grid and form using UI components.
How to Create UI Component Form and CRUD Operation In Magento 2
Learn how to create UI component forms and implement CRUD operations in Magento 2 for efficient backend management.
Magento 2 Create Category Attribute Programmatically
Learn how to create custom category attributes programmatically in Magento 2 for advanced category configurations.