How to Create UI Component Form and CRUD Operation In Magento 2
In this article, we'll guide you How to Create UI Component Form In Magento 2. Also, we will learn how to perform CRUD operations with custom module in Magento 2.
In our previous articles we've learn:
- How To Create Magento 2 Module
- How to Create Custom Database in Magento 2
- How to Insert Sample Data in Magento 2
- How to Create Model, Resource Model, and Collection in Magento 2
- How to Add Custom Admin Menu In Magento 2
- How to Create UI Component Grid In Magento 2
- How to Add Mass Action in UI Component Grid in Magento 2
I hope you have understood and applied those steps easily. We've already created a UI Compoment Grid you can refere it from above link. Now, lets learn How to Create UI Component Form and Perform CRUD Operation In Magento 2.
Let's get started!!
First of all we need we need to create layout for form and then we need to create controller to render that form. .
Step 1: Create helloworld_index_form.xml file at app/code/Devhooks/HelloWorld/view/adminhtml/layout/ and paste the below code.
saveCopyzoom_out_map<?xml version="1.0"?>

<page xmlns:xsi="http://www.w3.org/2001/XMLSchema-instance" xsi:noNamespaceSchemaLocation="../../../../../../../lib/internal/Magento/Framework/View/Layout/etc/page_configuration.xsd">
    <update handle="styles"/>
    <body>
        <referenceContainer name="content">
        	<uiComponent name="ui_form"/>
        </referenceContainer>
    </body>
</page>
In above code you see we've define uiComponent name with ui_form. So, now our next process is to create ui_form.xml which is responsible for uiComponent form all settings. But, before that we need to create Form.php controller file for render this layout.
Step 2: Create Form.php file at app/code/Devhooks/HelloWorld/Controller/Adminhtml/Index/ and paste the below code.
saveCopyzoom_out_map<?php

namespace Devhooks\HelloWorld\Controller\Adminhtml\Index;

use Magento\Backend\App\Action;
use Magento\Backend\App\Action\Context;
use Magento\Framework\Controller\ResultFactory;
use Magento\Framework\View\Result\PageFactory;

class Form extends Action
{

    protected $resultPageFactory;

    public function __construct(
        Context $context,
        PageFactory $resultPageFactory
    ) {
        parent::__construct($context);
        $this->resultPageFactory = $resultPageFactory;
    }
    public function execute()
    {
        $resultRedirect = $this->resultFactory->create(ResultFactory::TYPE_REDIRECT);
        $resultPage = $this->resultPageFactory->create();
        $resultPage->getConfig()->getTitle()->set(__('Form'));
        return $resultPage;
    }
}
We've set Form as a Form title in above code. You can change it as you want.
Step 3: Create ui_form.xml file at app/code/Devhooks/HelloWorld/view/adminhtml/ui_component/ and paste the below code.
saveCopyzoom_out_map<?xml version="1.0" encoding="UTF-8"?>
<form xmlns:xsi="http://www.w3.org/2001/XMLSchema-instance" xsi:noNamespaceSchemaLocation="urn:magento:module:Magento_Ui:etc/ui_configuration.xsd">
    <argument name="data" xsi:type="array">
        <item name="js_config" xsi:type="array">
            <item name="provider" xsi:type="string">ui_form.ui_form_data_source</item>
            <item name="deps" xsi:type="string">ui_form.ui_form_data_source</item>
        </item>
        <item name="label" xsi:type="string" translate="true">Form Information</item>
        <item name="config" xsi:type="array">
            <item name="dataScope" xsi:type="string">data</item>
            <item name="namespace" xsi:type="string">ui_form</item>
        </item>
        <item name="spinner" xsi:type="string">general_information</item>
        <item name="buttons" xsi:type="array">
            <item name="back" xsi:type="string">Devhooks\HelloWorld\Block\Adminhtml\Button\Back</item>
            <item name="reset" xsi:type="string">Devhooks\HelloWorld\Block\Adminhtml\Button\Reset</item>
            <item name="delete" xsi:type="string">Devhooks\HelloWorld\Block\Adminhtml\Button\Delete</item>
            <item name="save" xsi:type="string">Devhooks\HelloWorld\Block\Adminhtml\Button\Save</item>
        </item>
        <item name="template" xsi:type="string">templates/form/collapsible</item>
    </argument>
    <dataSource name="ui_form_data_source">
        <argument name="dataProvider" xsi:type="configurableObject">
            <argument name="class" xsi:type="string">Devhooks\HelloWorld\Model\Grid\DataProvider</argument>
            <argument name="name" xsi:type="string">ui_form_data_source</argument>
            <argument name="primaryFieldName" xsi:type="string">id</argument>
            <argument name="requestFieldName" xsi:type="string">id</argument>
            <argument name="data" xsi:type="array">
                <item name="config" xsi:type="array">
                    <item name="submit_url" xsi:type="url" path="*/*/save" />
                </item>
            </argument>
        </argument>
        <argument name="data" xsi:type="array">
            <item name="js_config" xsi:type="array">
                <item name="component" xsi:type="string">Magento_Ui/js/form/provider</item>
            </item>
        </argument>
    </dataSource>
    <fieldset name="general_information">
        <argument name="data" xsi:type="array">
            <item name="config" xsi:type="array">
                <item name="collapsible" xsi:type="boolean">false</item>
                <item name="label" xsi:type="string" translate="true">General Information</item>
                <item name="sortOrder" xsi:type="number">10</item>
            </item>
        </argument>
        <field name="status" formElement="checkbox">
            <argument name="data" xsi:type="array">
                <item name="config" xsi:type="array">
                    <item name="label" xsi:type="string" translate="true">Enabled</item>
                    <item name="prefer" xsi:type="string">toggle</item>
                    <item name="formElement" xsi:type="string">checkbox</item>
                    <item name="default" xsi:type="number">1</item>
                    <item name="dataScope" xsi:type="string">status</item>
                </item>
            </argument>
            <formElements>
                <checkbox>
                    <settings>
                        <valueMap>
                            <map name="false" xsi:type="number">0</map>
                            <map name="true" xsi:type="number">1</map>
                        </valueMap>
                    </settings>
                </checkbox>
            </formElements>
        </field>
        <field name="custom_field_1">
            <argument name="data" xsi:type="array">
                <item name="config" xsi:type="array">
                    <item name="dataType" xsi:type="string">text</item>
                    <item name="label" xsi:type="string" translate="true">Custom Field 1</item>
                    <item name="formElement" xsi:type="string">input</item>
                    <item name="source" xsi:type="string">custom_field_1</item>
                    <item name="dataScope" xsi:type="string">custom_field_1</item>
                    <item name="validation" xsi:type="array">
                        <item name="required-entry" xsi:type="boolean">true</item>
                    </item>
                </item>
            </argument>
        </field>
        <field name="custom_field_2">
            <argument name="data" xsi:type="array">
                <item name="config" xsi:type="array">
                    <item name="dataType" xsi:type="string">text</item>
                    <item name="label" xsi:type="string" translate="true">Custom Field 2</item>
                    <item name="formElement" xsi:type="string">input</item>
                    <item name="source" xsi:type="string">custom_field_2</item>
                    <item name="dataScope" xsi:type="string">custom_field_2</item>
                    <item name="validation" xsi:type="array">
                        <item name="required-entry" xsi:type="boolean">true</item>
                    </item>
                </item>
            </argument>
        </field>
    </fieldset>
</form>
In above code, you can see we've added buttons, and few fields. You can add as much as fields you want.
Now, we need to create few blocks files to render all those buttons. But before we creates that we need to create DataProvider Devhooks\HelloWorld\Model\Grid\DataProvider because we've used it for load data when form is render.
Step 4: Create DataProvider.php file at app/code/Devhooks/HelloWorld/Model/Grid/ and paste the below code.
saveCopyzoom_out_map<?php

namespace Devhooks\HelloWorld\Model\Grid;

use Devhooks\HelloWorld\Model\ResourceModel\HelloWorld\CollectionFactory;
use Magento\Ui\DataProvider\AbstractDataProvider;

class DataProvider extends AbstractDataProvider
{
    protected $loadedData;

    public function __construct(
        $name,
        $primaryFieldName,
        $requestFieldName,
        CollectionFactory $collectionFactory,
        array $meta = [],
        array $data = []
    ) {
        $this->collection = $collectionFactory->create();
        parent::__construct($name, $primaryFieldName, $requestFieldName, $meta, $data);
    }

    public function getData()
    {
        $items = $this->collection->getItems();
        foreach ($items as $model) {
            $this->loadedData[$model->getId()] = $model->getData();
        }
        return $this->loadedData;
    }
}
Now, let's create blocks files to render the below buttons.
- Back
- Reset
- Delete
- Save
Before we create all buttons we need to create Generic block which we'll extends on all buttons.
Step 5: Create Generic.php file at app/code/Devhooks/HelloWorld/Block/Adminhtml/Button/ and paste the below code.
saveCopyzoom_out_map<?php

namespace Devhooks\HelloWorld\Block\Adminhtml\Button;

use Magento\Backend\Block\Widget\Context;
use Magento\Cms\Api\PageRepositoryInterface;

class Generic
{
    protected $context;
    protected $pageRepository;

    public function __construct(
        Context $context,
        PageRepositoryInterface $pageRepository
    ) {
        $this->context = $context;
        $this->pageRepository = $pageRepository;
    }

    public function getUrl($route = '', $params = [])
    {
        return $this->context->getUrlBuilder()->getUrl($route, $params);
    }
}
Step 6: Create Back.php file at app/code/Devhooks/HelloWorld/Block/Adminhtml/Button/ and paste the below code.
saveCopyzoom_out_map<?php

namespace Devhooks\HelloWorld\Block\Adminhtml\Button;

use Magento\Framework\View\Element\UiComponent\Control\ButtonProviderInterface;

class Back extends Generic implements ButtonProviderInterface
{
    public function getButtonData()
    {
        return [
            'label' => __('Back'),
            'on_click' => sprintf("location.href = '%s';", $this->getBackUrl()),
            'class' => 'back',
            'sort_order' => 10,
        ];
    }
    public function getBackUrl()
    {
        return $this->getUrl('*/*/');
    }
}
Step 7: Create Reset.php file at app/code/Devhooks/HelloWorld/Block/Adminhtml/Button/ and paste the below code.
saveCopyzoom_out_map<?php

namespace Devhooks\HelloWorld\Block\Adminhtml\Button;

class Reset extends \Magento\Catalog\Block\Adminhtml\Product\Edit\Button\Generic
{
    public function getButtonData()
    {
        return [
            'label' => __('Reset'),
            'class' => 'reset',
            'on_click' => 'location.reload();',
            'sort_order' => 30,
        ];
    }
}
Step 8: Create Delete.php file at app/code/Devhooks/HelloWorld/Block/Adminhtml/Button/ and paste the below code.
saveCopyzoom_out_map<?php

namespace Devhooks\HelloWorld\Block\Adminhtml\Button;

use Magento\Backend\Block\Widget\Context;
use Magento\Framework\View\Element\UiComponent\Control\ButtonProviderInterface;

class Delete extends Generic implements ButtonProviderInterface
{
    protected $context;

    public function __construct(
        Context $context
    ) {
        $this->context = $context;
    }

    public function getButtonData()
    {
        $data = [];
        $id = $this->context->getRequest()->getParam('id');
        if ($id) {
            $data = [
                'label' => __('Delete'),
                'class' => 'delete',
                'on_click' => 'deleteConfirm(\'' . __(
                    'Are you sure you want to delete this?'
                ) . '\', \'' . $this->getDeleteUrl() . '\')',
                'sort_order' => 20,
            ];
        }
        return $data;
    }

    public function getDeleteUrl()
    {
        $id = $this->context->getRequest()->getParam('id');
        return $this->getUrl('*/*/delete', ['id' => $id]);
    }
}
Step 9: Create Save.php file at app/code/Devhooks/HelloWorld/Block/Adminhtml/Button/ and paste the below code.
saveCopyzoom_out_map<?php

namespace Devhooks\HelloWorld\Block\Adminhtml\Button;

use Magento\Framework\View\Element\UiComponent\Control\ButtonProviderInterface;
use Magento\Ui\Component\Control\Container;

class Save extends Generic implements ButtonProviderInterface
{
    public function getButtonData()
    {
        return [
            'label' => __('Save'),
            'class' => 'save primary',
            'data_attribute' => [
                'mage-init' => [
                    'buttonAdapter' => [
                        'actions' => [
                            [
                                'targetName' => 'ui_form.ui_form',
                                'actionName' => 'save',
                                'params' => [
                                    false,
                                ],
                            ],
                        ],
                    ],
                ],
            ],
            'class_name' => Container::SPLIT_BUTTON,
            'options' => $this->getOptions(),
        ];
    }
    protected function getOptions()
    {
        $options[] = [
            'id_hard' => 'save_and_new',
            'label' => __('Save & New'),
            'data_attribute' => [
                'mage-init' => [
                    'buttonAdapter' => [
                        'actions' => [
                            [
                                'targetName' => 'ui_form.ui_form',
                                'actionName' => 'save',
                                'params' => [
                                    true,
                                    [
                                        'back' => 'add',
                                    ],
                                ],
                            ],
                        ],
                    ],
                ],
            ],
        ];
        $options[] = [
            'id_hard' => 'save_and_close',
            'label' => __('Save & Close'),
            'data_attribute' => [
                'mage-init' => [
                    'buttonAdapter' => [
                        'actions' => [
                            [
                                'targetName' => 'ui_form.ui_form',
                                'actionName' => 'save',
                                'params' => [
                                    true,
                                    [
                                        'back' => 'close',
                                    ],
                                ],
                            ],
                        ],
                    ],
                ],
            ],
        ];
        return $options;
    }
}
We're all set. Now we need to create save controller for save form data.
Step 10: Create Save.php file at app/code/Devhooks/HelloWorld/Controller/Adminhtml/Index/ and paste the below code.
saveCopyzoom_out_map<?php

namespace Devhooks\HelloWorld\Controller\Adminhtml\Index;

use Devhooks\HelloWorld\Model\HelloWorldFactory;
use Magento\Backend\App\Action;
use Magento\Backend\App\Action\Context;
use Magento\Framework\Data\Form\FormKey\Validator;
use Magento\Framework\View\Result\PageFactory;

class Save extends Action
{

    public function __construct(
        Context $context,
        PageFactory $resultPageFactory,
        HelloWorldFactory $HelloWorldFactory,
        Validator $formKeyValidator
    ) {
        $this->resultPageFactory = $resultPageFactory;
        $this->HelloWorldFactory = $HelloWorldFactory;
        $this->formKeyValidator = $formKeyValidator;
        parent::__construct($context);
    }
    public function execute()
    {
        $resultPageFactory = $this->resultRedirectFactory->create();
        if (!$this->formKeyValidator->validate($this->getRequest())) {
            $this->messageManager->addErrorMessage(__("Form key is Invalidate"));
            return $resultPageFactory->setPath('*/*/index');
        }
        $data = $this->getRequest()->getPostValue();
        try {
            if ($data) {
                $model = $this->HelloWorldFactory->create();
                $model->setData($data)->save();
                $this->messageManager->addSuccessMessage(__("Data Saved Successfully."));
                $buttondata = $this->getRequest()->getParam('back');
                if ($buttondata == 'add') {
                    return $resultPageFactory->setPath('*/*/form');
                }
                if ($buttondata == 'close') {
                    return $resultPageFactory->setPath('*/*/index');
                }
                $id = $model->getId();
                return $resultPageFactory->setPath('*/*/form', ['id' => $id]);
            }
        } catch (\Exception $e) {
            $this->messageManager->addErrorMessage($e, __("We can't submit your request, Please try again."));
        }
        return $resultPageFactory->setPath('*/*/index');
    }
}
Step 11: Now, open Command line in folder root of magento and run both commands
saveCopyzoom_out_mapphp bin/magento setup:upgrade

php bin/magento cache:flush
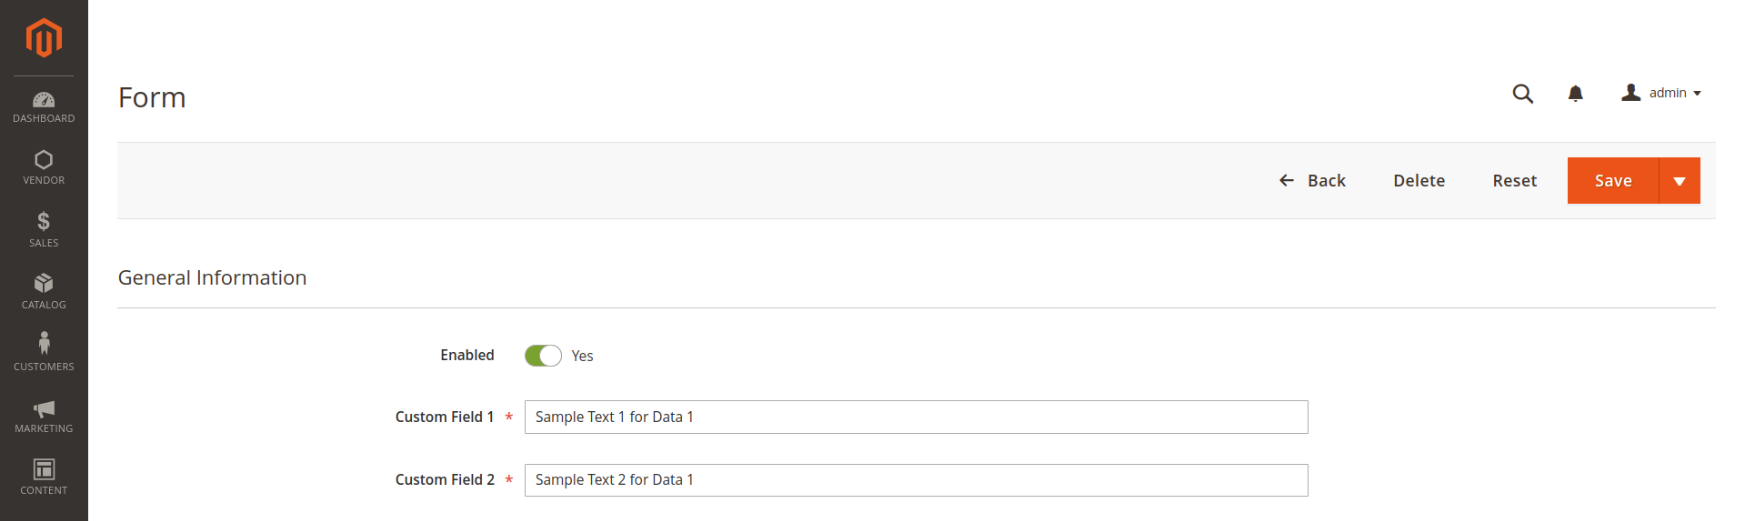
Log in to the admin of your Magento 2, navigate to the grid and click Add New Record button or edit any existing record and you'll see form like the below screenshot.
We have successfully created UI Component Form and Perform CRUD Operation, we hope this article helped you to know How to Create UI Component Form and Perform CRUD Operation In Magento 2.
If you want to know how to create a Frontend Controller then check our another article which is How to Create a Magento 2 Module with Frontend Controller.
Also, check this article to know How to Create Custom GraphQL in Magento 2.
That's it,
Bookmark it for your future reference. Do comment below if you have any other questions or doubts.
P.S. Do share this post with your team.
Special thanks to Rutvik Monpara, He helped me a lot to write a series of How to Create UI Component Grid and Form in Magento 2.
AI-Powered Recommended Articles
How To Create Magento 2 Module with Admin Grid and Form using UI Component
Learn how to create a custom Magento 2 module with an admin grid and form using UI components.
How to Add Mass Action in UI Component Grid in Magento 2
Learn how to add mass actions to Magento 2 UI component grids to enhance administrative efficiency.
How to Create UI Component Grid In Magento 2
Learn how to create a custom UI component grid in Magento 2 for enhanced administrative functionality.
How to Add Custom Admin Menu In Magento 2
Learn how to add a custom admin menu in Magento 2 for creating personalized admin sections.
How to Create Model, Resource Model, and Collection in Magento 2
Step-by-step guide to creating a model, ResourceModel, and collection in Magento 2 for custom data handling.
How to Create Custom Table and Insert Sample Data in Magento 2
Create custom tables in Magento 2 and insert sample data for testing or customization purposes.